
Chapter 1 · Glass and tin timing
Smash Fest Level 2 Guide — Two-Shot Mixed Wall Plan
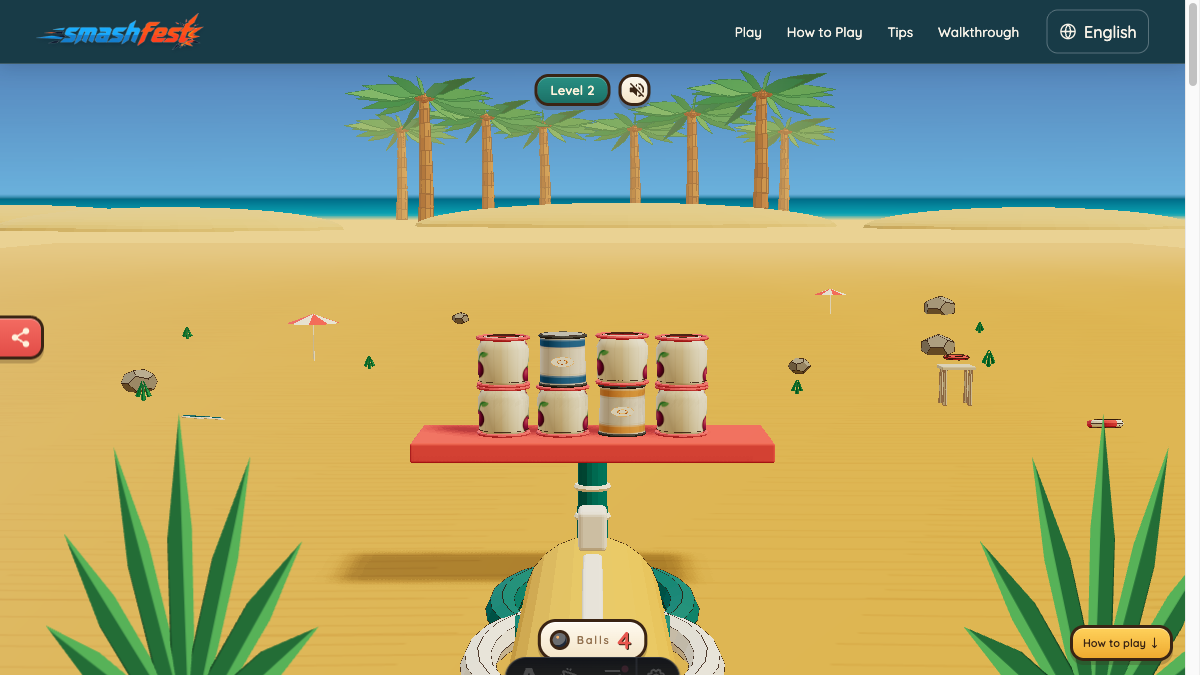
Level 2 replaces the large practice wall with eight targets arranged across four columns and two rows. The structure mixes glass and tin, provides four cannonballs, and sets a par of two. The smaller budget changes the question from “what can I hit?” to “which contact can affect more than one material?” Glass can break on impact, while tin generally needs enough sideways movement to leave the platform.
The center strategy attached to this level points toward the shared middle of the wall. That does not mean blindly hitting the geometric center at any height. The useful opening is low enough to disturb support and aligned so the moving pieces have an outward route. A two-shot clear depends on allowing the first collision to finish before deciding which material still needs direct attention.
Cannonballs
4Materials
Glass · TinPar
2Targets
8Understand the two-row mixed wall
The formation is only two rows high, with four targets across each row. Its horizontal span is much smaller than Level 1, so an impact near the center can reach a large share of the structure. Mixed materials create two different success signals: broken glass is gone immediately, but a tin target may survive the collision and continue sliding. Check the objective counter after the scene becomes calm rather than assuming every fallen-looking can is cleared.
Because par is two and the total allowance is four, there is room for recovery but not for four unrelated single-target shots. Plan the first ball to open the formation and preserve the second for the surviving side. The extra two balls are insurance for an unusual settle, not the default solution.
Opening plan: disturb the shared base
Aim at a low target just off the midpoint, choosing a line that continues toward an open side of the platform. This gives the ball a chance to break glass while carrying motion into neighboring tin. Avoid a steep top hit: with only two rows, removing a top piece does little to the row supporting it.
After the first impact, identify whether the remaining objective is brittle glass or movable tin. That material determines the second shot. Glass needs a clean contact; tin needs a direction that takes it off the surface. Waiting before this decision prevents you from aiming at an object that is already falling or sliding clear.
Step-by-step Level 2 plan
Choose a low central contact
Set the reticle on the lower row near the middle, slightly favoring the side with a clearer outward lane. Fire once and keep the reticle still while the wall separates.
Read material-specific results
Confirm which glass targets shattered and which tin targets remain on the platform. A tin can lying sideways still requires attention if the objective counter includes it.
Direct the second shot at the stable remainder
For glass, use a direct center contact. For tin, shoot through the target toward the nearer edge. Prefer a stable cluster over an isolated object that is still moving.
Use reserve balls only after a full settle
If the two-shot plan leaves an objective, use the third ball as a precise recovery. Keep the fourth untouched until that recovery has completely resolved.
Why one opening can address two materials
The wall is compact, so the lower center connects both columns and rows through short contact paths. A direct hit can break a glass target while its impulse moves tin beside or above it. Once a gap opens, gravity rotates the upper row into new contacts instead of leaving it balanced in place.
The second shot becomes efficient because the first shot has already sorted the level into cleared objects and a small stable remainder. Rather than repeating an identical aim, you adapt to the material still present. That is the central lesson of Level 2 and the first place where material recognition directly changes the cleanup line.
Alternative when the first shot clears only one side
If one half remains as a two-target vertical pair, aim at the lower member. A direct glass hit removes support; a tin hit should travel outward so both pieces gain lateral movement. If the remaining targets are separated, prioritize the stable tin first and let any moving glass finish its fall before spending the reserve.
Common Level 2 mistakes
Treating tin like glass
A visible hit is not enough for tin. Plan the direction needed to move it beyond the platform.
Repeating the same shot
The material and position left after shot one should determine shot two; identical aim wastes the information gained.
Spending reserve balls early
The four-ball allowance feels generous, but immediate follow-ups can turn a two-shot structure into four single cleanups.
Level 2 replay checklist
- The opening contacted the lower row near the shared center.
- The second aim was chosen after identifying the surviving material.
- Tin was pushed toward an edge rather than merely knocked over.
- Moving targets received time to settle before cleanup.
- Reserve balls remained insurance instead of becoming the plan.
Continue learning
Replay Level 2 from the browser game, then compare the result with the material and support principles in the related guides. Physics can settle differently after small aim changes, so use the visible target count as the final check.