
Chapter 1 · Tin wall fundamentals
Smash Fest Level 1 Guide — Clear the Tin Wall
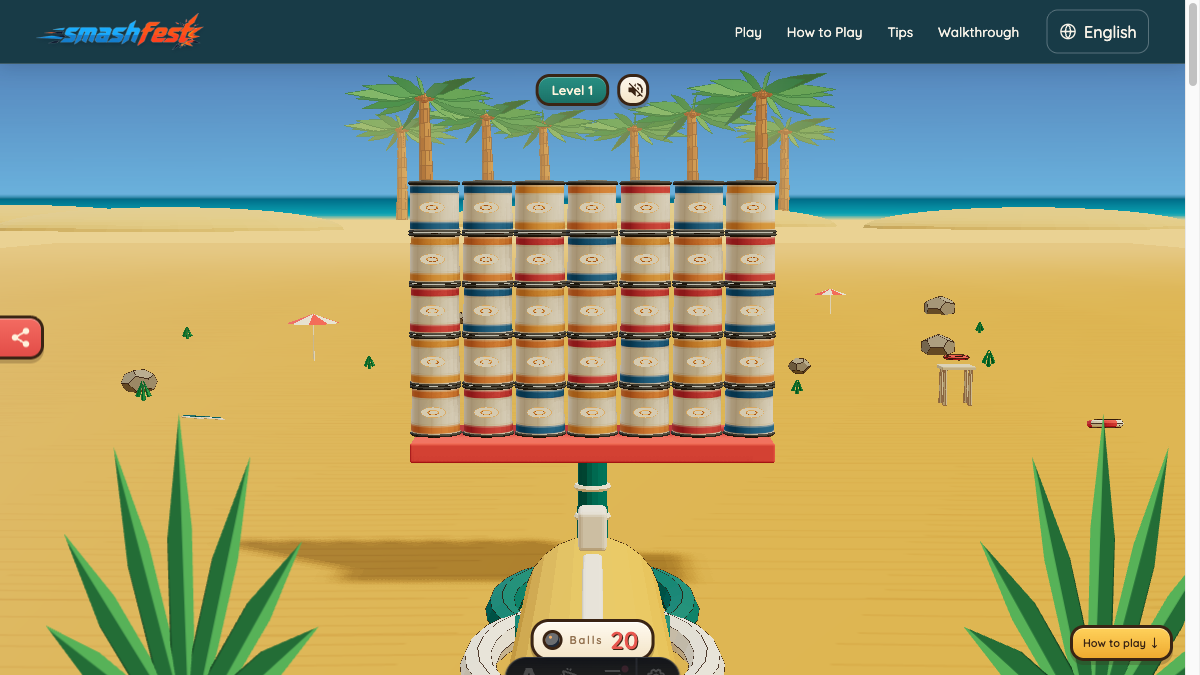
Level 1 is a wide wall of 35 tin targets arranged in seven columns and five rows. You receive 20 cannonballs, while the par target is five shots. That large reserve makes the opening level forgiving, but the useful lesson is not to spend every available ball. Tin does not disappear like glass. A can must be pushed off the play surface, so the result of a hit depends on direction, follow-through, and the movement of neighboring cans.
Treat the level as an introduction to controlled displacement. The wall spans both sides of the center line and rises through five rows. A high hit may move one can without disturbing the base. A low central hit transfers motion into several contacts and gives gravity time to separate the formation. The guide below uses the five-shot par as a planning budget, not as a promise that every physics run will settle in exactly the same way.
Cannonballs
20Materials
TinPar
5Targets
35Read the wall before firing
All 35 objectives are tin, so there is no brittle glass target to remove instantly. The lowest row supports a dense stack above it, and the middle columns carry targets on both sides. That makes the lower center the most useful place to begin: it is connected to more of the wall than an exposed top corner. Before releasing a shot, use the full width of the reticle to compare the bottom row with the nearest table edge.
The formation is symmetrical enough that you can evaluate left and right as two cleanup zones after the opening impact. Watch for cans that rotate in place but remain on the platform. They are still live objectives. A dramatic wobble is not a clear; wait until the motion settles and use the remaining-target count rather than the animation alone to decide whether another shot is needed.
Opening plan: create movement through the center
Aim the first ball at a low can near the shared center rather than at the top row. The purpose is to push into the base, open a gap, and make the upper cans lose clean vertical support. Keep the shot level enough to carry horizontal force through the stack. After impact, do not fire immediately: several cans can continue sliding or knock one another toward an edge after the first obvious collision.
Use the second shot only after you can see which half retained a stable base. If the left side is already moving outward, direct the next ball into the low right cluster. If the wall separated evenly, choose the side with more targets still standing. This conditional choice is more reliable than repeating the same aim point while the first collapse is still developing.
Step-by-step Level 1 plan
Open low and central
Place the reticle on a bottom-row tin target close to the midpoint. Release one ball and let the impact spread through adjacent cans. The goal is broad movement, not a single impressive launch.
Wait for the first separation
Track both outer edges until sliding and rolling slow down. Count the stable clusters that remain. Do not spend a second shot merely because the first ball has left the screen.
Break the stronger side
Aim low into the side that still has several stacked rows. A shot through its inner base tends to send targets outward, while an outside-to-inside hit can bunch cans back toward the center.
Use the last planned shots as cleanup
Reserve the fourth and fifth shots for isolated cans or a narrow stable column. Aim from the center toward the nearest open edge and confirm the remaining-target counter after each settled impact.
Why the low-center approach works
The wall carries its upper rows through many direct contacts. Moving a low central can removes support and adds sideways impulse where the formation is most connected. Upper cans then have room to fall, rotate, and collide instead of remaining aligned. Tin targets benefit from this chain of pushes because each secondary collision can add the displacement needed to cross an edge.
The waiting period is part of the strategy. Rapier continues resolving contact, gravity, and rolling after the first hit. Firing into a moving cluster can redirect it away from an open edge or spend a ball on a target that was already going to fall. Patience turns the generous 20-ball allowance into a controlled five-shot exercise.
Recovery when the wall splits but stays on the table
If the opening produces two compact piles rather than a full collapse, stop trying to recreate the first shot. Treat each pile as a smaller wall. Hit the inner, lowest can of one pile so the force travels outward, wait, then repeat on the other side. For a single can lying flat, aim through its center toward the closer edge; a glancing top hit may only spin it.
Common Level 1 mistakes
Starting at the top
A top-row hit can move one target while leaving all five supporting rows organized. Begin where the wall carries weight.
Firing during the collapse
Moving cans can clear themselves. An early follow-up often changes useful outward motion into an untidy central pile.
Ignoring a rotating can
Rotation looks active but does not count as removal. Wait for it to leave the surface or plan a directed cleanup shot.
Level 1 replay checklist
- First shot entered the lower center of the wall.
- Each follow-up waited for the target count to stabilize.
- Side clusters were pushed outward, not back toward the middle.
- Cleanup shots targeted stable objectives rather than moving cans.
- The run used the five-shot par as a plan despite the 20-ball reserve.
Continue learning
Replay Level 1 from the browser game, then compare the result with the material and support principles in the related guides. Physics can settle differently after small aim changes, so use the visible target count as the final check.