
Smash Fest strategy guide
15 Smash Fest Tips to Clear Every Level Faster
Use 15 practical Smash Fest tips to read structures, save cannonballs, trigger physics cascades, and clear browser levels faster.
These Smash Fest tips are for players who want a repeatable plan instead of hoping that a lucky cannonball clears the table. Every one of the 100 browser levels has a fixed arrangement, a fixed ammunition budget, and physics that keep moving after the first impact. The useful sequence is simple: read the load-bearing pieces, choose an impact zone that affects more than one target, then give gravity time to finish the job. The 15 tips below move from aiming basics to material-aware chain reactions, so they work whether you are opening Level 1 or taking on a reinforced late-game puzzle.
Use the guide beside the playable level rather than as a substitute for it. Glass, tin, wood, and stone do not ask for four unrelated solutions; their mass, shape, friction, and position decide which move creates the largest change. A direct blast can clear the closest target, nearby glass is especially vulnerable, and anything that leaves the play area is cleared. That is why the best shot is often aimed at a support or an open edge instead of at the most obvious object. When a level fails, replay it with a different first target and keep the result of each collapse in mind.
Smash Fest Tips for Beginners — Master the Basics First
Smash Fest Tips: Read the table before you fire.
Before moving the reticle, trace the table from the bottom upward. Ask which block, beam, or cylinder is carrying the weight above it and which side of the structure has room to move. A visible glass target can be an easy cleanup later, while the low wood beam beneath it may be the piece that changes the entire layout. You are looking for a support, an open lane, or an object already close to an edge. This short pause turns the first shot into a decision about the whole structure instead of a reaction to the nearest target.
Aim before you fire — every release spends a ball.
Move or drag the reticle until it sits on the exact impact area you want, then release only when the path makes sense. A release over open space still launches a cannonball, and an empty shot does not create a useful new angle. On a mouse or touch screen, small aim changes matter most near a shared base or a tight gap. Think about the blast radius as well as the center point: the target closest to the impact can clear immediately, while nearby pieces receive a push. If the reticle has drifted away from the structure, reposition first instead of correcting after a wasted shot.
Let gravity finish the job.
After each shot, watch until the pieces stop moving before choosing another target. The game clears targets that fall out of the play area, so a rolling tin can, a sliding wood beam, or a stone that tips from a support may still solve the problem without another cannonball. Firing into moving debris can also spoil a clean follow-up angle by pushing a useful piece back toward the center. Patience is especially valuable after a low hit, because the first collision may take a moment to transfer weight through a tower. Treat the settling time as part of the shot, not as dead time between shots.
Count cannonballs before making a plan.
Read the ammunition number before the first release and compare it with the difficult targets on the table. You do not need a one-to-one count for every object because one collapse can remove several targets, but the number tells you how efficient the main reaction must be. If a level has several heavy stones and a tight budget, plan to remove supports or send them toward an edge rather than trying isolated pokes. Save a likely cleanup shot for a target that cannot join the main fall. Counting first prevents the common mistake of spending early balls on easy objects and discovering too late that the final support still needs a deliberate hit.
Do not spend a shot on glass by habit.
Glass is light and close-range blasts can clear it readily, so an immediate shot can look tempting. That is useful only when removing the glass opens a lane or starts a reaction. If a glass target sits under a beam, beside a rolling can, or below a falling stone, let the larger movement do the work for free. Save the cannonball for the support that creates the movement. The same rule applies to any easy target: a quick clear is not automatically a good clear. Your opening shot should improve the board state by exposing an edge, releasing weight, or connecting two groups of targets—not merely clear one object.
Smash Fest Tips for Intermediate Players — Read the Structure
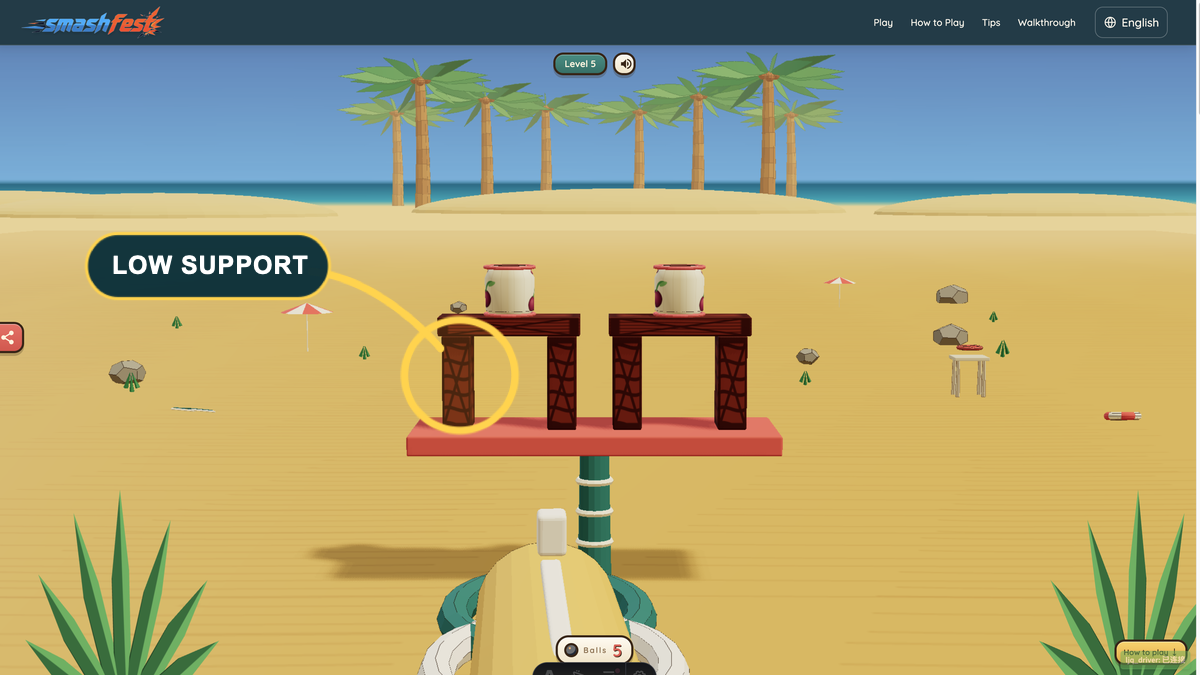
Smash Fest Tips: Shoot the bottom, not the decoration at the top.
Tall stacks can draw attention to the upper target, but the lowest shared support usually has more value. A blast near the base can shift a beam, remove the nearest block, and leave everything above it without a stable route. Aim low enough that the resulting fall has somewhere useful to go: toward an open side, through a glass cluster, or onto a lower layer. Do not treat every lower object as a guaranteed weak point; a stable base can absorb a poor hit. Instead, identify the contact point that carries more than one object. Removing one meaningful connection is often stronger than hitting the largest visible target.
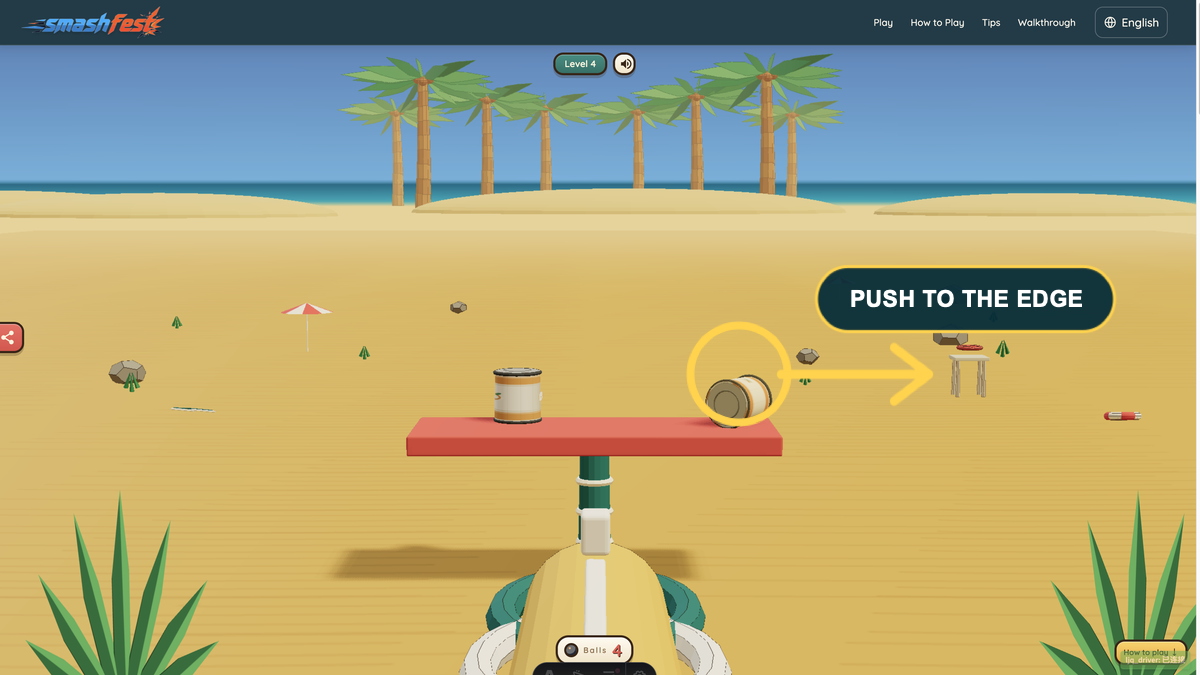
Use edge shots to create exits.
The table edge is a strategic destination, not merely scenery. Tin cylinders can roll, wood can slide, and even a heavy stone becomes easier to clear once it is already leaning toward an open side. A shallow blast that grazes an outer object may create more useful rotation than a central hit that drives the structure inward. Before aiming, look for the nearest unobstructed exit and check whether a neighboring block will stop the movement. Then push in the direction of the edge rather than simply toward the middle of the target. A small, controlled nudge is often enough to let gravity complete the clear.
Know what each material changes.
Material names are planning clues. Glass is light and can clear when a blast happens close to it, so it is useful for opening a blocked lane. Tin is the lightest material and its cylindrical shape makes sideways movement and rolling valuable. Wood often appears as a beam or block that carries another object, so its position matters more than its surface. Stone is heavy and high-friction, which means a casual glancing hit may change little; it usually needs a direct impact zone, a lost support, or a clear route to an edge. Read material together with position, never as a standalone rule.
Build chain reactions on purpose.
A chain reaction is a sequence you can predict before firing: the blast removes or moves a base piece, the upper weight starts to fall, that movement pushes a neighboring group, and one or more targets leave the play area. Start with the first link that has the fewest ways to fail. A wood beam under a mixed stack, a tin can beside an open rim, or a stone balanced above glass can all be useful if there is space for the next movement. Do not call every noisy collapse a chain reaction. If the objects fall into a stable pile in the middle, the shot created spectacle but not a plan.
Use precision in tight spaces.
Later layouts place objects close together, so the difference between hitting a support and hitting an isolated target can be only a small reticle movement. Slow down before release and ask which object is closest to the intended blast center. A nearby glass target might disappear too early, leaving a beam in place; a nearby stone might absorb the useful force you meant for a lighter piece. Use a clear lane whenever one exists, and wait for the board to settle before aiming through a newly opened gap. Precision is not about making every shot dramatic—it is about making every shot change the next decision in your favor.
Pro Smash Fest Tips — Master the Physics Engine
Treat stone as the real ammunition budget.
Stone is the heaviest material in the browser game and it has higher friction than the other targets, so it resists casual sideways movement. On a stone-heavy level, identify each stone before firing and decide whether it will be cleared by a close direct blast, by losing support, or by leaving the table. That decision is more useful than counting all targets equally. A stone that falls through a lower group can transfer momentum and create a second reaction; a stone left flat in the center can consume several cleanup shots. Plan its destination before you fire at the support beneath it, and preserve an ammunition reserve if one stone has no safe route.
Exploit the edge before the structure becomes a pile.
The easiest moment to send an object out is usually before the first big collapse compresses everything into the middle. If an outer can, beam, or block is already close to a clear side, consider a low sideways blast early. Once debris gathers around the base, the same object can become trapped behind several others and require a direct cleanup. Edge planning is especially strong on bridges and split towers: choose the side whose falling pieces have room to continue moving, then avoid shots that push them back toward the center. The goal is not to knock something down; it is to give it a route completely off the board.
The last cannonball can still win.
When the ammunition counter reaches zero, do not restart immediately. The game gives active balls and moving targets time to settle before it decides the level is lost. A final blast may remove the closest target, tilt a stone, or push a tin can far enough that gravity finishes the last clear after the cannon is empty. Watch for the remaining target count and let the motion resolve. This is not a reason to waste the final ball; it is a reminder to choose a shot with a delayed outcome in mind. A good last shot creates movement that continues after the impact sound ends.
Replay early levels to practise one idea at a time.
The first chapter is useful practice because the layouts teach clear concepts with generous room: center lanes, simple falls, glass near tin, and a first shared support. Replay a cleared level with one deliberate experiment. Try moving the opening hit lower, choosing the opposite edge, or waiting longer before the second shot. You are not only chasing a lower shot count; you are learning how the same blast changes a different shape. Once you can explain why an early level clears, later bridges and mixed-material stacks become less mysterious. Practice works best when you change one decision and observe the result instead of firing faster.
Smash Fest Tips: Use a three-second rule before every shot.
Pause for three questions before release. First: what is this blast meant to change—an isolated target, a shared support, or an object near an exit? Second: what should move next if the plan works, and where can it go? Third: how many cannonballs remain after this choice, including a likely cleanup shot? If you cannot answer one of those questions, keep reading the table rather than firing. This routine prevents accidental empty shots, turns chain reactions into predictions, and makes failed retries informative. With a fixed layout and budget, a calm plan is more reliable than fast aim.
Smash Fest Tips: Know Your Materials
Every target can clear when it leaves the play area, but each material changes how easily you can create that exit. Use this table as a planning shortcut, then check the actual support and open side in the level in front of you.
| Material | Near-impact behavior | Best move | Planning note |
|---|---|---|---|
| Glass | Light; a close blast can clear it | Open a lane or include it in a collapse | Do not spend a ball if a larger fall can reach it |
| Tin | Light, cylindrical, and inclined to roll | Push sideways toward an open edge | Direction is usually more valuable than force |
| Wood | Medium-weight block or load-bearing beam | Change the support path beneath a stack | Check where the released weight will land |
| Stone | Heavy and high-friction | Use a close impact, support loss, or edge route | Plan its destination before you move it |
Smash Fest Tips for Every Skill Level
The 100 levels introduce ideas in chapters. Use the stage of the game to decide whether you should practise aim, structure reading, or a multi-step physics plan.
| Level range | Core challenge | Best tips to apply |
|---|---|---|
| Levels 1–20 | Aim, simple glass/tin movement, open lanes, and wood supports | Tips 1–5: read the base, aim deliberately, wait, and count ammunition |
| Levels 21–50 | Stone weight, mixed materials, towers, bridges, and cleanup | Tips 6–10: target structure, edges, material behavior, and planned chains |
| Levels 51–100 | Reinforced stone structures and steadily tighter ammunition margins | Tips 11–15: stone budgeting, exits, delayed settling, practice, and the three-second rule |
Smash Fest Tips FAQs
What is the best Smash Fest tip for beginners?
Read the lowest shared support and the nearest open edge before the first shot. Aim for a move that changes several targets, then wait until the physics settles before spending another cannonball.
How do I beat Smash Fest levels with few cannonballs?
Plan one collapse that removes multiple targets, keep a likely cleanup ball, and use supports or edges to move difficult objects. A fixed ammunition budget rewards efficient reactions rather than rapid firing.
Which material is hardest to clear in Smash Fest?
Stone is usually the hardest to move because it is heavy and high-friction. Give it a close impact, remove the support beneath it, or create a clear route to an edge instead of relying on a glancing hit.
Should I fire the next cannonball as soon as I hit something?
No. Wait for rolling, falling, and sliding pieces to settle. Targets that leave the play area clear automatically, and firing too soon can waste ammunition or block a clean follow-up angle.
How do I trigger a chain reaction?
Choose a first impact that removes a support or pushes an outer object toward a route. Predict the next movement before firing: a falling weight should reach another group or an edge, not merely form a stable pile.
What should I do after I use the last cannonball?
Wait. The game lets active balls and moving targets resolve before declaring a loss. A last blast can still win if the resulting fall or roll clears the final target after the ammunition counter reaches zero.
Can I replay levels to practise Smash Fest tips?
Yes. Replay early layouts to test one change at a time, such as a lower opening shot or a different edge. Fixed layouts turn retries into useful physics practice rather than guessing.
Are there hidden tricks most players miss?
The useful hidden habit is patience: use the impact zone, not only the visual center of a target; look for an exit before a collapse; and let gravity finish work that does not require another cannonball.
Ready to Put These Smash Fest Tips to Work?
Open a real level, apply one Smash Fest tip, and choose the first shot with a clear purpose. The next clear will teach you more when you know which support, edge, or material behavior produced the result.
Play Smash Fest Now — Free in Your Browser